Sunday, December 24, 2006
Another Song
Recycled Soap Dispenser

Items needed:
- 1. Empty clear pump bottle. I get a body wash from Wal-mart. The bottle is very big and clear. It just has a sticker, and I just remove it.
2. Assortment of things to decorate it. I use beads, cheap silk flowers, marbles ect.
3. Clear soap
Directions: When your bottle is empty, just fill it with an assortment of things. Then, you fill it with clear or tinted soap. I keep one in my bathroom and my kitchen. I put things in them that match with the colors in each of these rooms. This also makes a nice attractive gift for someone.
Monday, November 27, 2006
Classic Songs Islamic Style

Assalam alykom
My middle daughter who is four loves to sing songs. With growing up in America, I know many songs and rhymes that are part of my American culture. As an adult, these songs still remain imprinted in my memory, and I can recall them quickly. Eventhough, I have not heard most of these songs in over 30 years, I am still able to remember all the words. Many of these songs are quite catchy, and this could be one reason they remain with me. One of my favorites is Old Mcdonald Had A Farm. While singing this to my four year old daughter, I was inspired to change it around a little and make it more Islamic. This way in fits better with our life style as Muslims. Here is my version of this famous song:
Old Abdullah had a farm
Al hamdolilah, Al hamdolilah, Al hamdolilah,
And on that farm he had a sheep
Al hamdolilah, Al hamdolilah, Al hamdolilah
With a baaa here and a baaa there.
Here a baaa there a baaa everywhere a baa baa.
Old Abdullaha had a farm
Al hamdolilah, Al hamdolilah, Al hamdolilah
Old Abdullah had a farm
Subhannallah, Subhannallah, Subhannallah
And on that farm he had a duck
Subhannahallah, Subhannallah, Subhannallah
With a quack here and a quack there.
Here a quack there a quack everywhere a quack quack.
Old Abdullah had a farm
Subhannallah, Subhannallah, Subhannallah.
Old Abdullah had a farm
Allaho Akbar, Allaho Akbar, Allaho Akbar
And on that farm he had a cat.
Allaho Akbar, Allaho Akbar, Allaho Akbar.
With a meow here and a meow there.
Here a meow there a meow everywhere a meow meow.
Old Abdullah had a farm
Allaho Akbar, Allho Akbar, Allho Akbar
I hope you enjoy this song as much as my daughter and I have liked it. I have a few more, I have rewrote. I will save them for future posts, Inshallah.
Wednesday, November 15, 2006
The Story of My Cat

Assalm alykom:
I recently wrote a story about our family cat. I sent my story to www.islamonline to see if they were interested. I have never written anything before, therefore I was very surprised that they liked the story. They published it to the website in Ramadan. They did an excellent job putting the story together and illustrating it. The story is for children and was inspired by our family cat who is pictured here. Our cat had runaway from home. It is a true story about this misfortune. The only untrue part is the ending. Our real life story did not end as happily as the one I wrote. For the link below, go to the stories called The Power of Duaa': Yusseff's Wish and The Power of Duaa': Bootsie's Return. I hope you enjoy the story as much as my family liked it.
You will find the story here
Monday, November 13, 2006
A Name Change: Loving Allah and Raising My Kids
 Assalm alykom:
I have recently had an opportunity to teach in an Islamic school. With this new career, I was also able to enroll my children in school for the first time. I am no longer considered an official homschooling mother. I am now a middle school Language Arts and History teacher. For the first time in their lives, my children are experiencing school.
The whole life style change has had many ups and downs. I think one of the positive things is the excitement that my children have to get up and go somewhere. There are many afterschool activities for them to involve themselves. Another positive note is the praise for the K12 cirriculum I was using. It is very advanced and has equipped my children above the normal level. My son was even able to skip a grade. One downside was the fact that my children never had to be responsible for organizing themselves. They had to learn to write down assignment in their planners. They had to learn to keep track of homework, they had to know when to bring what book for a test. It was hard for them at first, but now they are catching on to it all.
I hope to share my ideas that I have from my experience as a teacher. Keep checking back. I have many writing ideas to post in the future, Inshallah.
Wednesday, September 06, 2006
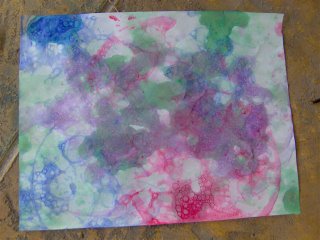
Bubble Painting
Assalm alykom:
Here is a quick and easy project for all ages. Be prepared to do it in a safe area because it is very messy. Here is how we did it:
Materials needed:
- Paper(I used colored construction paper and white paper)
- Dish soap
- Bowls
- Straws
- Food coloring or tempra paints
Directions: Put water and dish soap in a bowl. You then add either tempra paints or food coloring. If you have little ones, I would use food coloring because it is more safe. Then you put your straw in the mixture and blow bubbles. Make sure you are in an area that you do not want to spill the mixture. Also, make sure your children are wearing a smock. When they start blowing the bubbles, the colors splash everywhere. When the bubbles are filling up in the bowl, gently place your paper over them. It makes a nice print on the paper.
Here are some more: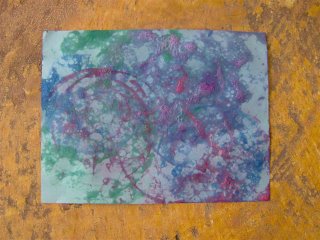
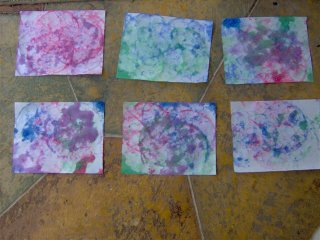
My kids made them into cards and sent them to their pen pals.
Tuesday, September 05, 2006
Tip #3 Multiple Children

Assalm alykom:
Here is a great helpful tip for those of you who have multiple children. If your children are between one and two years apart in age, you can combine some of your subjects. As many of you know, I teach from the K12 virtual school . The K12 school recommended that I teach some of the subjects at the same grade. They also said I should take the higher grade on these subjects. I started this in first grade. The subjects I decided to combine were History and Art. I could have combined Science too. However, I did not feel that my daughter was ready for the higher grade in that subject. At the time, there was a great deal of material involving measuring in the metric system. I did not think my daughter could skip a grade in that. Now, we are doing third and fourth grade. Teaching the History and Art at the fourth grade level saves me a good deal of time. I would recommend any of these subjects to combine with your children. Math and Language Arts would not be advised unless one child is more advanced and could just skip a grade. I find that any amount of time saved in homeschooling is a real valuable treasure. I hope that I have helped you achieve some of this value in your school.
Sunday, September 03, 2006
Arabic Tile Magnets

Assalam alykom:
Here is yet another tile project. Here is how I did it:
Materials needed:
- Small ceramic tiles
- Glass paints that are oven curable
- Paint brushes
- Hot glue gun or strong adhesive
- Small thick round magnet
Directions: Paint your Arabic letters or numbers on to the tile. Follow the directions on the manufactures label for the paint. The one that I use, has a curing time in the oven for around a 1/2 an hour. After the tiles cool, you add your magnet with a hot glue gun or your choice of adhesive.
Friday, September 01, 2006
Jesus God the Son or Son of God or Son of Mary
The Da Vinci Code brought Jesus to the minds of hundreds of millions of people. Jesus is a very controversial figure. The controversy about him includes speculations ranging from being a liar bastard to being Almighty God. As people disagree about the reality of Jesus, they agree on the importance of finding the truth about him. In your quest to find the truth about Jesus, you may turn to historical writings, New testament writings or to the movie theater. But, have you thought about the Quran as a source to find the truth about Jesus? Do not be surprised, you can find the truth about Jesus in the Quran of Muhammad. In the Quran, Allah communicates to us pivotal truths about Jesus, his birth, mission, message, ascension, and return. Loveallah has just produced a small booklet listing everything that Allah said about Jesus in the Quran. This booklet is very instrumental to the dawah efforts. Friends, family members, co-workers and neighbors are great candidates to receive this powerful booklet. You can send your email to abunour@loveallah.net and request a free copy of the book.
This entry was taken from the introduction of the booklet "Jesus God the Son or Son of God or Son of Mary Read the Quranic Testimony." All credit should be given to the website www.loveallah.net for its effort and support to the dawah.
Monday, August 07, 2006
WOW! Look what a little paint can do!
 Assalm alykom:
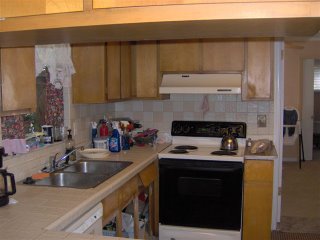
This was my last big project of the summer. It was the biggest project by far. We live in a house that is well over 30 years old. I have the kitchen cabinets to prove it. They were in really poor shape. They were packed with dirt that I had tried many things hoping to remove it. I looked into having the cabinets refaced. This is the existing cabinets with a laminate put on the outside. Well, the price tag for this was $7000. This was way above my price range. I then proceeded to check Home Depot and they told me the price would be 30-40% higher than the refacing. Well my next idea was painting them. My husband told me no last year, and that it was to much work. He said the cabinets just needed replacing. This year, I decided to present him with more information to make it more convincing. I searched the internet for all the different ways to go about repainting them, and changing the hardware. I researched all the different kinds of paints, cleaners and hardware for the cabinets. I went to home depot and priced everything and then I presented my case. This year, that approach seemed to work, and he said yes. Here are some before and after pictures of how it all turned out: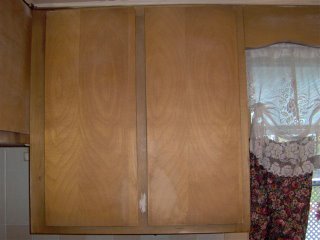
 The paint that I used is called Kilz Colors It was a real thick durable paint. We did not have to paint so many coats and we did not have to paint a primer before we painted them. Here are some more before and after shots.
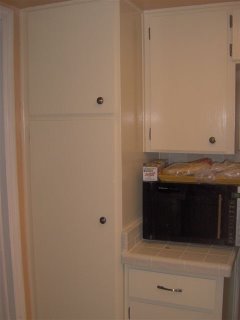
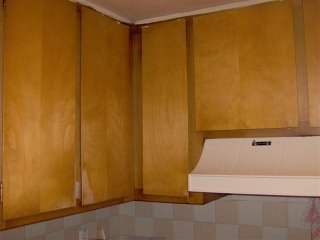
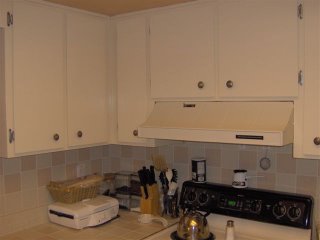
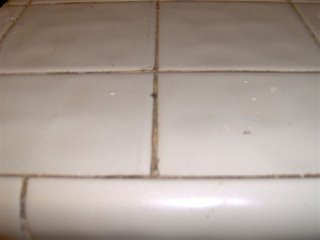
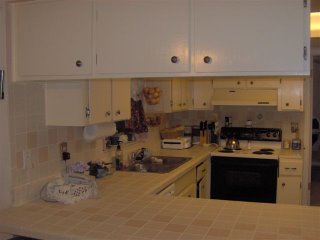 The tiled counters were also in bad shape. I took a small grout saw and cut all the grout out . Then, I just regrouted the counter and the wall. I found a product that was called a grout sealer. This is suppose to prevent it from staining when food spills happen. I am still skeptical if it really works. Here is a before and after of this job.
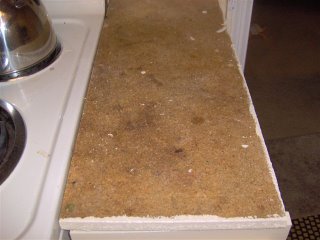
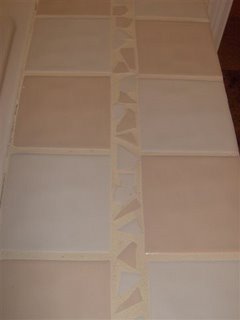
 This part of the counter was completely missing all of the tile. I did a little mosaic work on this part. This way I could fit the tiles without having to cut them. Here is the before and after on this.
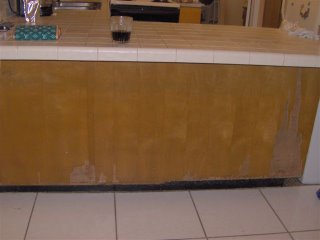
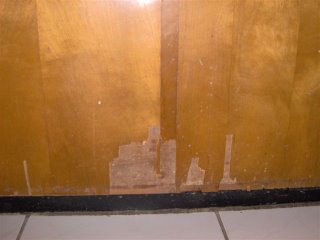
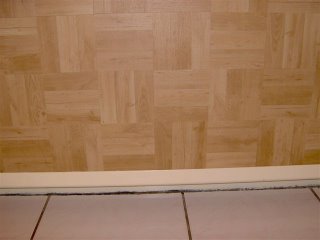
 I have a bar that divides the kitchen from the living room. The wood had started to peel off in sheets. Therefore, I could not paint it because the surface would not be even. I researched it at Home Depot and came up with a few options. One was a laminate that could be glued on to the bar. This was a little pricey and looked complicated. My husband thought we could use vinyl tiles that we use on the floor. So that is what we did. We also painted some molding the same color as the cabinets and placed it along the bottom and the sides. See what you think about the before and after on this one?

 After the very expensive estimates I had got for new cabinets, how much do you think this little remodeling job cost me? Well it cost 2 weeks of my time, a little sweat and around $200. I am very pleased with the results and the price! Therefore, if you decide to replace your cabinets, try a little paint for a fraction of the price.
Wednesday, August 02, 2006
Home Decorating: Bar Stools
Assalm alykom:
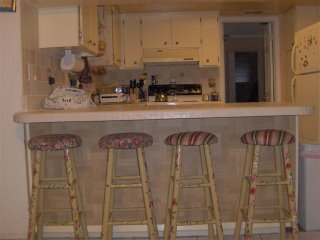
Last year I spray painted these bar stools white. Well, with four kids the paint did not last long. This year I decided to paint them with latex paint. After painting them a nice tan color, I decided to paint flowers and vines down the side of them. To assure that the paint would not be scratched off, I put a couple coats of polyurathane on it. Now, they look really shiney, and they clean up real easy too. For the covers, I needed something that would be easy to clean. I have tried putting a plastic over the covering with a staple gun. However, my children always complain about the plastic and it usually starts to rip. So, I came up with an easy removable cover that I can just throw in the wash. I choose fabrics that would not show to much stains. I cut a large circle bigger than the stool. I sewed a casing large enough to run a small elastic piece through it. I just tightened the elastic so it would fit snug over the stool. Now, I can remove them and wash them easily. Here is how they turned out:


My counter where the stools are, extend out to the living room area. Therefore, I just made some pillows for the couch from the same material as the stools.
Sunday, July 30, 2006
Tic-Tac Name
Assalm alykom:
Here is a nice little game that I made for my children. We call it Tic-Tac Name.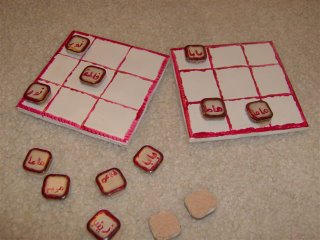 Materials Needed to Make the Game
- Small tiles(usually sold in sheets with a lot of tiles on the sheet)
- Larger tile
- Oven cured glass paints
- Hot glue gun
- felt
Paint at least five small tiles with each name of your family member. As you can see, we did ours in Arabic. For mine and my husband, I wrote mama and baba. If you have friends over often, you might want to paint one that says friend or guest. Paint the lines on your larger tile with the grid for a tic-tac toe game. After you paint everything, place them in the oven as directed with the glass paint you choose. Do not buy air dry glass paints because the paint may come off more easily. After the tiles are painted, cured and cooled off, you need to glue a piece of felt on the bottom of them all. I used a hot glue gun and it is still sticking to the bottom of mine. Here is a picture of what I did:
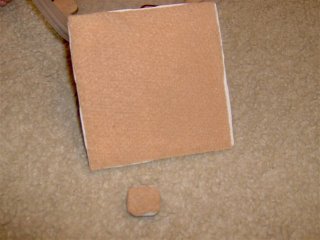 This keeps it from scratching your tables and other furniture the kids may set the game on. I hope you enjoy the game as much as we do! It is actually a little harder to play and pay attention because I am use to x's an o's. Therefore, my attention is not as sharp when I try to see the names. Let me know how you do InShallah!
Tuesday, July 25, 2006
Tip #2 How to keep up with the socks
 Assalam alykom:
Well, as all of you homeschooling mothers know, keeping up with your house duties can really be a challenge. Here is another advice that is part of the laundry. It might save you some time. Any time that you can save in homeschooling can be very valuable. I have six people in my family. Keeping socks organized as they drift through the laundry process can be impossible sometimes. I have been given the advice to pin them when you put them in the wash or wash them in a seperate bag. Well, none of these methods worked for me because it was to much trouble to pin them and washing them in a seperate bag was to much trouble for me to coordinate. Here is what I found works for me. When I take the clothes from the dryer, I right away remove the socks and place them in a designated sock basket. I do not worry about seperating and matching the socks at this point. Once a week, I have my two older children sort all the socks for the week. They make a game out of it sometimes and see who can match the most socks. After they finish matching, they each put them all away. This works great for us. We may still have missing socks, but at least those we could find are all matched up each week.
Wednesday, July 19, 2006
My mosaic Table
Assalm alykom:
After Doing a few mosaic pots, I thought I would try my hand at a coffee table. 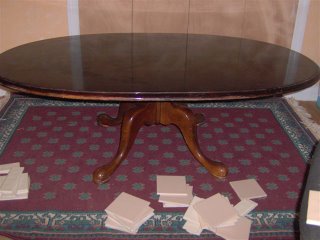 I had acquired this old coffee table from a friend of mine. It had quite a bit of dents and scratches on it. Therefore I really could not decide what to do with it. Repainting would be too hard. There is a thick load of varnish on top and the pedestal is a different color all together. I liked the look of the table and it was sturdy and good quality. Therefore, I decided to tile it. First, I mapped out my design. I used whole tiles, broken tiles and glass jewels. I glued them on the table with silicone glue. Here is how it looked after I glued them:
 I let the tiles dry over night and the next day I added the grout. I bought a nice cream color to match the tiles. When I added the grout, I noticed that I could not cover the sharp edges on the broken tiles that were on the edge. Therefore, I just removed them all together. Here is how it looked after I added the grout:
  Since I took the tiles from the sides and the original paint was two different colors, I just sanded the edge and the pedestal and painted it to match the tiles. Here is the result:
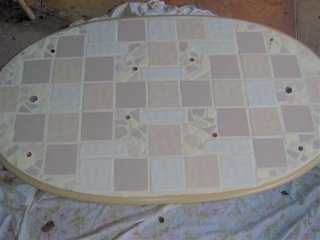
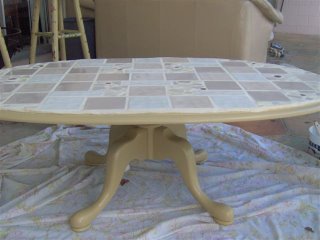 I was really surprised how nice it turned out. Then, I got to thinking what if my four messy children wiped chocolate, spilled juice or their just plain dirty hands messed up the grout. So, after a little contemplating and research on the internet, I decided to paint several coats of polyurathane over the top. It turned out better than I thought! It is also highly durable. See for yourself:
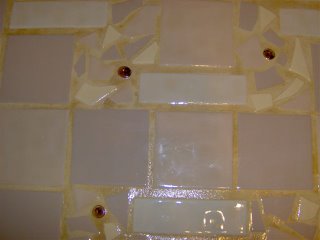

 This is what I call a trash to treasure project. Someone gave me the table, and the tiles were leftovers from house remodeling. I am really enjoying it and would not mind trying another piece of furniture.
Monday, July 17, 2006
Mosaic Flower Pots
This next project is quite easy to do. It is a little messy, but alot of fun. Here is what you need to do the flower pots:
- 1 clay terra-cotta flower pot
- Silicone glue
- Sanded grout
- Tiles, buttons, flat glass gems, shells, broken dishes, ect.
- disposable gloves
- A sponge
- a bucket
Decide what kind of items you would like to have on your pot. You can use almost anything. This picture here is one that my children did and they used broken tile pieces and flat glass gems.

Please note that this project is very messy and is best done outside. To break the tiles, I put them inside an old towel and break them carefully with a hammer. After you get the right amount of tiles broken that you want, you glue them where you want with the silicone glue. If you have your children do this, have them wear gloves and be very careful of the sharp tile pieces. Let the glue dry for several hours. Now, you are ready to mix the grout. Grout comes colored. Therefore, you can choose the color to match your tiles. Make sure the grout is sanded grout. Mix the grout with water until it comes like a thick paste. It should be almost the consistency of peanutbutter. Make sure you have gloves on when applying the grout to the pot. Apply the grout with your fingers until you are able to push it into all of the spaces between the tiles. Do not worry if it is covering the tiles. You will wipe it off later. Let it dry for about 15 minutes. Then take a bucket of water and a sponge and smooth the grout off the tiles with the sponge. Do it very gently so you do not rub all the grout off. You have to keep rinsing your sponge off. I usually let it dry for another 10 minutes and wipe it again. I may do this several times until I achieve the look that I want. Finally I let it dry over night. The next day I will just polish the cloudiness off the tiles, and it is ready to put your flowers into it. You can use broken pieces of dishes, shells, buttons, ect. I have even thought of using legos on one for the kids room. The ideas are endless.
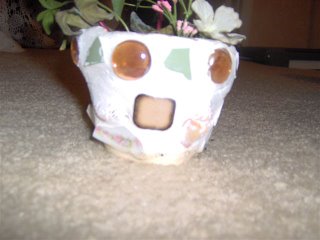

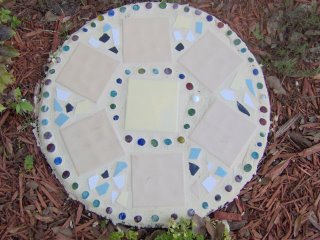
This is a stepping stone that I did in my garden. It was very old and looking like it could go in the garbage. So, instead of throwing it out, I tiled it! If anyone needs any help once you start. Just make a comment in the post, and I will be happy to help.
Thursday, July 13, 2006
Tip #1: The Laundry
 Assalm alykom:
I decided to offer a tip each week or so on my blog. These tips are related to my ability to maintain my religion, homeschooling, houseduties, my children and my sanity. I found in the beginning, homeschooling can be quite overwhelming with all my other duties as a wife and mother. I have found a few tips along the way that have made my whole homeschooling experience much easier. Therefore, here is the first one:
The Laundry
Laundry can be quite overwhelming in a large family. It is even more so when you homeschool. When I first started out, I always found myself with laundry all over my living room. Half of it folded and ready to be put away. The other half would be waiting for me to have time to fold it. Then, there was the mounds of it in the garage still waiting for me to wash. Something had to be done. I could not keep going like this. What I first did was lower my standards about the laundry. It was never being put away because I did not like how my children would put it away. Well, after lowering my standards, I put my children to work with the laundry. My washer and dryer is in our garage. I found a laundry sorter at Wal-mart. My son is responsible for sorting his clothes according to color. My older daughter sorts hers and her sisters. I sort my clothes and my husbands. After the clothes go through the wash, I fold them and put them in a laundry basket. My children then pick up their baskets and put the clothes away themselves. My son does his own, my older daughter puts hers and her two younger sisters' clothes(they are all in one room), and I put my husbands' clothes and mine. Now, I no longer have clothes waiting to be folded and put away. I try to do one load a day and the children put them away about every two to three days. The clothes are not always put away they way I would like, but at least they are not all over my living room. They are also learning to be responsible for the house duties. I had another problem and that is with matching up sock for six people. I will save that for tip #2.


